So we recently went to Great Wolf Lodge and had a blast playing all of the games with the magic wand that you can get there. The only thing is, once you get back home these wands become just some more stuff that the kids have and lose all of their magic. However, with some inspiration from Seth’s project to use a wand to control a lamp, a 3D printer, and some coding skills, I created these Minecraft lanterns that are controllable by a Great Wolf Lodge magic wand.
Why?
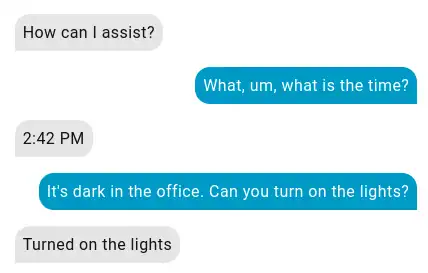
The dream: a Minecraft lantern controlled by a MagiQuest wand.
To start, why not? But in seriousness – I’m tired of buying my kids one use toys that they never touch or play with again. Being able to control these lanterns ( and their bedroom lamps ) with the wands let them bring some of the magic home. And let’s be honest, it’s fun to build things.
Supplies
To build the lantern, you only need a few parts and some basic tools. Most of these are easy to find online or already in your toolbox. Here’s what I used:
- ESP32 board – Amazon
- Addressable LED strip – Amazon
- TSOP1736 IR sensor – AliExpress
- USB mini cable – Amazon
- 3D printed Minecraft lantern shell – MakerWorld
- 3D printed LED insert for inside the lantern – MakerWorld
- Wires and soldering supplies – to connect everything
- Dremel or cutting tool
- Hot glue / hot glue gun
- Masking tape
- Pencil or pen
- MagiQuest wand from Great Wolf Lodge – the “magic” controller
This list looks long, but most of the work is just snapping or wiring pieces together. If you’re looking for an easier project that can use the magic wands, check out my review of Seth’s Magic Wand Sensor Kits.
Flashing the ESP32
The ESP32 needs new software before it can control the lantern. This step is called flashing.
I connected the ESP32 board to my computer with the USB cable and installed WLED using install.wled.me. This site makes the process simple and only takes a few clicks. I just did the basic install of the most recent version of WLED to get started. This allowed me to make sure that I could flash the ESP32 without any issues. I also used the setup page to configure the Wifi connection for WLED, so I could access the device easily later.
Next, you’ll need a custom version of WLED that works with the MagiQuest wand. To do this, I followed the compiling instructions and uploaded the custom branch from this GitHub pull request.
With that done, the ESP32 is ready to be configured.
Wiring Things Together

The wiring for this project is pretty straightforward. I started with some Dupont wires to make sure that everything was working correctly before moving on to soldering everything together. My wiring ended up looking like the diagram above. You’ll want to double check what your LED strip’s inputs are, they may not match mine.
LED Strip Wiring
- Red (Power) → ESP32 VIN
- Green (Ground) → ESP32 GND
- White (Data) → ESP32 D13
IR Sensor Wiring
- With the sensor facing you (white, red, green left to right):
- White (Signal) → ESP32 D4
- Red ( Orange – Power) → ESP32 3V3
- Green ( Blue – Ground) → ESP32 GND

Here’s a closeup of the wiring with Dupont wires. Note that the IR receiver’s red is orange here, and it’s green is blue. I wanted to make sure they were easily told apart from the LED lines.
Configuring WLED

Once the ESP32 is flashed, it needs to be configured. This is where you set up the WiFi, presets, and some extra settings so the lantern works the way you want. Your settings might differ slightly depending on your hardware or what other features you want enabled.
Setting up WiFi
During the initial install of WLED (before flashing the custom branch), make sure to connect the ESP32 to your home WiFi. If you skip this, you’ll need to connect directly to the ESP32’s own WiFi network instead. Look for “WLED-AP” and use the default password “wled1234.” After saving your WiFi details, unplug the device and plug it back in. Sometimes it takes a restart for the settings to stick.
Setting up light presets

WLED lets you create presets for different lighting effects. I set up three:
- Fire color with the Candle effect for “Fire Candle” (the main lantern glow)
- Atlantica color with the Candle effect for “Soul Candle”
- Solid effect with brightness set to 0 for “Turn Off”
Simply pick the colors and effects you want, and click the “+ Preset” button to name your preset. These three presets give the lantern a warm flicker, a cool blue glow, and a way to shut it down. Take note of the ID of your “Fire Candle” preset, you’ll need it later.
More settings

In the Config > WiFi Setup page, I set an mDNS name for the device so it’s easier to find on the network.

In the Config > LED Setup page, I set the LED output length to 30 LEDs and the Data GPIO to pin 13. For the infrared sensor, I used GPIO 4 and changed the IR remote type to JSON Remote. I also set “Apply Preset 1 at boot” (this is my “Fire Candle” preset ID), and turned on Timed Lite with 30 minutes, default brightness 0, and Mode set to Fade.
I recommend a quick power on / power off at this point, just to make sure that all of the settings are sticking. You don’t want to have the lantern all put together and find out it needs to be configured again.
Getting the Wand ID

Next up was getting the Wand ID. This was simultaneously one of the harder and easier steps. The hard part here was connecting to the lantern with a Serial Monitor. If you don’t have one installed, I used the Microsoft extension that’s available with VS Code. I did run into an issue where my computer wouldn’t detect the connection on the USB ports, and had to install drivers to fix it. Once I got that sorted, the rest was pretty easy. I simply waved the wand at the IR sensor a few times while the Serial Monitor was running and grabbed the ID of the wand. You may see some “UNKNOWN” entries. These are IR blasts from the wand that failed to decode properly. Ignore them.
Configuring WLED to Respond to Your Wand

Next up, you’ll want to take the wand ID that you grabbed from the serial monitor, and configure WLED to respond to it. Open up your device’s webpage, and add /edit to the end of it’s URL to get to the file editor page. So, since my lantern is at http://office-lantern.local, I would go to http://office-lantern.local/edit
If you do not see an /ir.json file here, add it. Then for each wand that you want able to control your lantern, add a new line that starts with the wand ID. For two wands, your file should look similar to the screen shot above. Here’s the code for a wand to control the device, replace the “0x8801” part with your wand’s ID.
"0x8801": { "Next Preset": "Next Preset", "cmd": { "ps":"1~3~","nl":{"on":true,"dur":30,"mode":1,"tbri":0} } }Putting the Lantern Together

I started by just putting the walls on the base of the lantern, and putting the top arch, grey top the arch connects to, and the black top together. These should all snap together with the connectors that were printed with the lantern.
Adding the IR Sensor

The IR sensor needs to be exposed to read the wand, so I needed to cut a small hole in the black top of the lantern for the IR sensor to sit in. Yes, I could have altered the print files to accommodate the sensor, but with my file editing skills just cutting the hole manually was easier. This is where the masking tape comes in handy. Stick a 1-inch piece of tape on your sensor and trace the bump where the sensor lives.
You’ll take this piece of tape and place it on the black top layer of the lantern to know what part to carve out. I used a Dremel to do the cutting, and it went super easily. Cut an opening on the bottom of the black part so that the IR sensor can slide through it, and another opening on the grey lid for wires and the sensor to pass through.
Putting the Top Together

If you haven’t soldered everything together, then this is a great time to do that. I made sure that the wires were about 5″ long so that I had plenty of length for getting the sensor and lights in the correct spot.
Run the IR sensor and its wires through the grey then the black lid part of the lantern. Make sure the IR sensor is exposed and sits in the hole you made. Use hot glue to secure the sensor in place. Snap the black and grey lids together. I added some more hot glue in the grey lid hole, just to keep everything secure.
Adding the LEDs

Before adding the LEDs, stuff the ESP32 inside the printed tube that is used to support the LEDs. It should be inserted with the USB end pointed down ( towards the side with the ridge on it, not the half circle cutouts ). You will be running the LED wiring up the tube, and wrapping the LEDs around the outside of the tube to cover it. I used the sticky backing of the LED strip for an initial mount of the LEDs, then followed that with hot glue to secure the LEDs onto the tube.
After your LEDs are secure, run your USB cable in through the bottom of the lantern to the tube and plug in your ESP32 to make sure everything is still working. If everything looks good, place the tube in the lantern (ridge side down), then add the top onto your lantern. Add the bottom cap onto your lantern and you’re done.
Troubleshooting
I did run into a few hiccups while setting up and configuring the lanterns. Here’s what I did to resolve them.
Computer Doesn’t Detect ESP32
I ran into an issue early where my computer didn’t see the ESP32 that I was connecting via USB cable. After double checking the documents and the WLED install page‘s “No device found?” link, I ended up installing drivers for my computer to see the device.
WLED Device Not on Wifi
If you can’t see your WLED device on your Wifi, chances are that it failed to connect and is broadcasting it’s own Wifi SSID. Set your computer or phone to scan for Wifi devices, and look for a “WLED-AP”. You will need to connect to this, using the password “wled1234”. You should be prompted to login again, which will open up your WLED device’s webpage and allow you to configure it’s settings. Be sure to power on / power off ( not restart ) after configuring the Wifi to make sure that the new settings take effect.
Wifi Settings Not Persisting
I found that setting up the Wifi on my WLED device was simple, but often wouldn’t save or apply the settings. If you are seeing a similar issue, after changing your Wifi settings try completely unplugging ( not restarting ) your ESP32 and plugging it back in. Sometimes, turning it off and on again really does help.
Summary
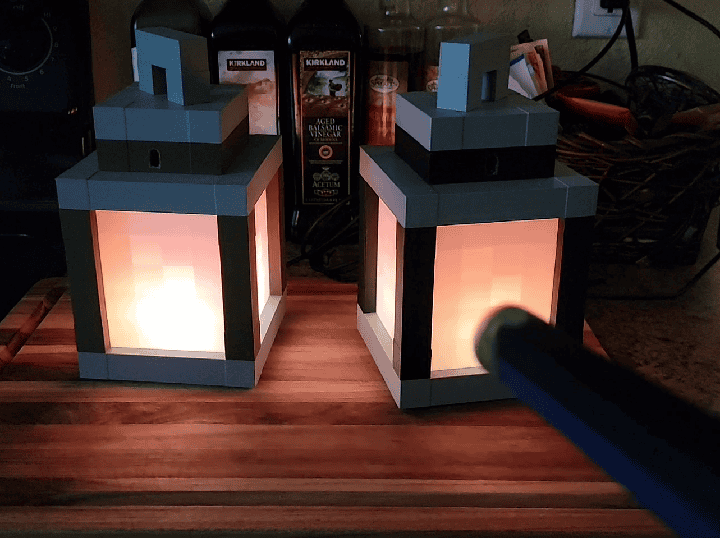
Building this lantern was a fun mix of coding, wiring, and a little crafting. The ESP32 and WLED made it possible to bring a Minecraft-style prop to life, and the MagiQuest wand gave it some real magic. It’s not a hard project once you break it into steps, and the result is a custom lantern that my kids can control with just a wave of their wand.